
Tasmota
How to Connect Your Tasmota Device to Wi-Fi:
Prepare Your Device: Ensure your Tasmota device is powered on and ready to be configured.
Access the Tasmota Configuration Mode: When powered on, your device will create its own Wi-Fi Access Point (AP) for initial configuration. Look for a Wi-Fi network named something like tasmota-xxxx (where xxxx is a unique identifier). Connect to this network using your phone, tablet, or computer, there will be no password.
Open the Configuration Page: Once connected to the Tasmota AP, open a web browser and go to http://192.168.4.1. This will open the Tasmota configuration page.
Enter Your Wi-Fi Credentials: On the configuration page, click on the “Configure Wi-Fi” option. You will see fields to enter your Wi-Fi SSID (network name) and Wi-Fi password. Enter the SSID and password of the Wi-Fi network you want your Tasmota device to join. Click on “Save”.
Reboot and Connect: The device will reboot after saving the Wi-Fi credentials. It will then attempt to connect to the specified Wi-Fi network.
Find Your Device on the Network: Once the device is connected to your Wi-Fi network, you need to find its IP address. You can check your router’s DHCP client list for a new device. The device name typically starts with tasmota-. Alternatively, use a network scanning tool (e.g., Fing) to locate the Tasmota device on your network.
Once you have the IP address, enter it into the web browser’s address bar. This will open the Tasmota web interface where you can further configure your device.
__________________________________________________________________________________________________
Troubleshooting Tips:
- Incorrect Wi-Fi Credentials: Double-check the SSID and password you entered. Ensure there are no typos and that your network is within range.
- Network Issues: If the device doesn’t connect, try rebooting your router or checking your Wi-Fi coverage.
- Resetting Wi-Fi Settings: If you need to start over, you can reset the Wi-Fi settings by holding the device’s button (if it has one) for 40 seconds or by using the fast power cycle recover method. (https://tasmota.github.io/docs/Device-Recovery).
By following these steps, your Tasmota device should be successfully connected to your Wi-Fi network, ready for further configuration and integration with your smart home system.
__________________________________________________________________________________________________
Tasmota Version:
Newly manufactured SmartPad branded Tasmota devices will come shipped with Tasmota version 11 if there is a build available for the specific devices ESP Chipset in version 11.
We have made this decision to make the path to transition devices to another firmware (like ESPHome) easier, since a new partition layout was introduced in Tasmota 12+ for ESP32 based devices that makes it very challenging to transition to a different firmware. If you would like to run the latest version of Tasmota, you can update from v11 following the instructions below for ESP 32 based devices.
Upgrading ESP32 from Tasmota V11 to a newer version:
This process is only required for ESP32 based devices. ESP 8285 devices can be upgraded directly from the firmware upgrade menu.
- Start by Backing up your device configuration.
- Access the console and run “SetOption65 0” (this ensures that the ability to reset the device via power cycle recovery has been enable incase it was ever disabled).
- Next update your device to Tasmota V 12.5 (this will be used to migrate to the safeboot partition scheme). Please download and upload the bin file, don’s change the default firmware URL.
- http://ota.tasmota.com/tasmota32/release-12.5.0/tasmota32c3.bin (This is the link to the version for the ESP32C3 used in our smart plug devices).
- Download the Partition Wizard Tapp File, and upload it to your device at
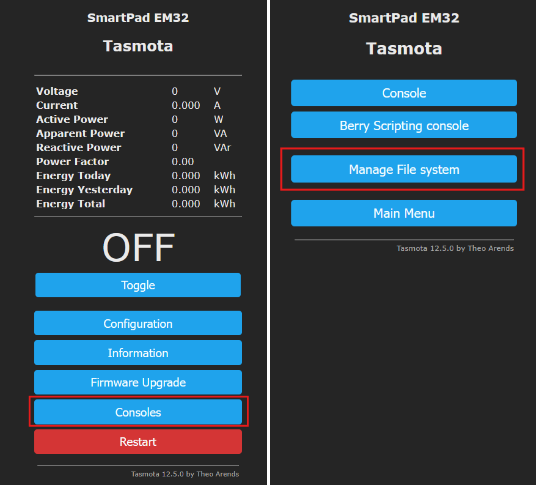
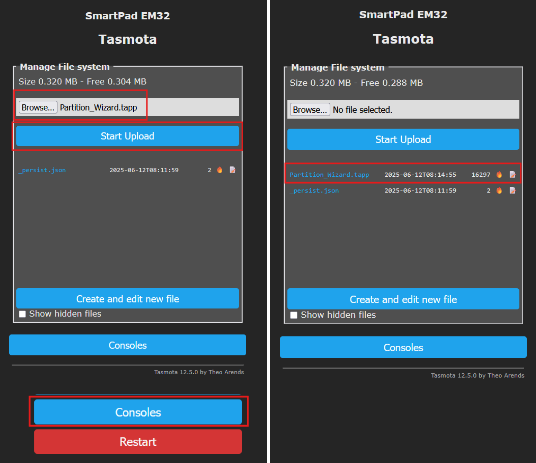
https://github.com/arendst/Tasmota/raw/eb3de9c73a23e5559123dd85df70f844aaa46f33/tasmota/berry/modules/Partition_Wizard.tapp - To upload the file, Access the Consoles Menu and then select Manage File System.
- In the file manager browse to the downloaded Tapp File and click start Upload, once the file appears in the File list, Restart the device:.
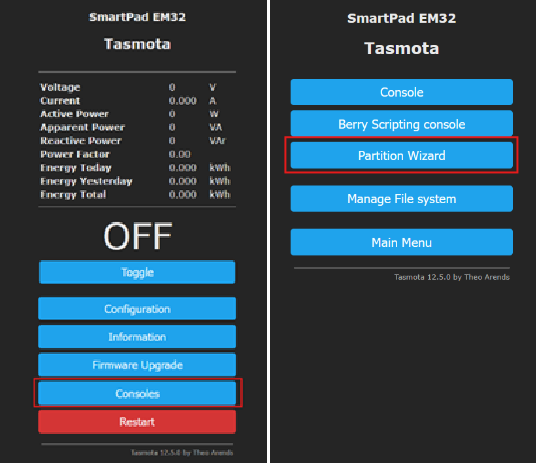
Once the device has restarted, you can access the Consoles Menu, and select Partition Wizard.
In the partition Wizard, Click “Start Migration” to upgrade your device to the latest version of Tasmota.
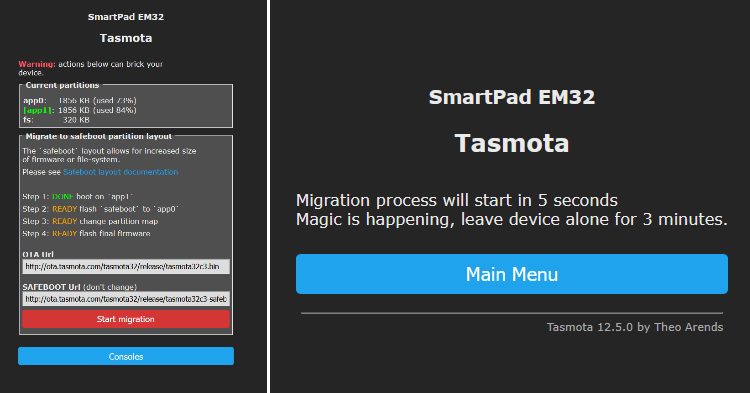
This process will take a few minutes, please do not interrupt the process. After 3-5 min, you can refresh your browser console and your device should be upgraded to the latest version of Tasmota.
__________________________________________________________________________________________________
Power Calibration:
If your device supports power management, we do calibrate the power monitoring features for you before dispatching the order. https://tasmota.github.io/docs/Power-Monitoring-Calibration
__________________________________________________________________________________________________
Backup:
Please backup your device as soon as possible. If your device has been calibrated and gets reset it will need to be recalibrated if you do not have a backup.
__________________________________________________________________________________________________
ESP Home
How to Connect Your ESP Home Device to Wi-Fi:
Access the ESP Home Configuration Mode: When powered on, your device will create its own Wi-Fi Access Point (AP) for initial configuration. Look for a Wi-Fi network named something like smartpad-device-XXXX. Connect to it, no password needed.
Open the Configuration Page: Once connected to the ESP Home AP, open a web browser and go to http://192.168.4.1. This will open the ESP Home Wi-Fi configuration page.
Enter Your Wi-Fi Credentials: Pick your home Wi-Fi network from the list that pops up, fill in your Wi-Fi password and click Save.
Wait a bit: The device will restart and join your home Wi-Fi. If you use Home Assistant or ESPHome, it’ll show up there soon!
__________________________________________________________________________________________________
Add your ESP Home device to Home Assistant:
- Open Home Assistant, and check your Notifications, you should get a notification to let you know your device has been discovered. Click or tap “check it out”
- You will be taken to the Integrations screen where you will see the new device ready to be added to Home Assistant, Click Add, then Submit, and follow any prompts to finish adding your device.
Your device should now be added to home assistant and ready to use.
__________________________________________________________________________________________________
Advanced Configuration:
If you have mDNS turned off on your network, or vLANS configured, your device might not be discovered automatically. If you dot see the device, follow these steps:
- Open Home Assistant and go to Settings > Devices & Services.
- Click Add Integration and search for “ESPHome.”
- Type in your Devices IP address (a number like “192.168.1.25”—find it in your Wi-Fi router’s settings or ESPHome logs).
- Click Submit, and you’re done.
__________________________________________________________________________________________________
Make It Your Own (Optional / Advanced):
Do you want to tweak your SmartPad device (like adding sensors or buttons)? Here’s how:
- Open the ESPHome Device Builder (part of ESPHome or Home Assistant). You will notice it is showing that device(s) have been discovered. Click Show to view the discovered devices.
- Find your SmartPad device in the list and click Take Control. Follow the prompts to finish taking control of your device.
- You can now click Edit to change the device settings.
__________________________________________________________________________________________________
Troubleshooting Tips:
- Wi-Fi Won’t Connect: Double-check you’re using 2.4 GHz Wi-Fi (not 5 GHz) and that your password is correct.
- Can’t Find the Device: Restart your Device and Wi-Fi router. Look at your router’s list of connected devices to see if it’s there. If you have fancy network settings, they might block it. Try a basic setup.
- Still Stuck? Reset to Factory Settings: If your SmartPad Device isn’t behaving, you can start fresh. Find the power button on the device, press and hold it for 10 seconds, then let go. This resets it to its original settings, like it’s brand new. After resetting, start again from Step 1.
__________________________________________________________________________________________________
Devices with Power Monitoring:
Some SmartPad devices can measure how much power something uses (like a light or heater). Here’s what to know:
- Out of the box, it has a safety feature to turn off if it senses too much power (based on the device’s max limit). You can remove this if you take control of the device.
- Each device is unique, so the power readings should be pretty close out the box but might not be perfect at first—they could need a little tuning.
How to Tune Power Readings (Recalibration):
- Once your SmartPad device is on your Wi-Fi, go to its IP address in a browser (like “192.168.1.25”).
- You’ll see three settings to adjust: Current Multiplier, Current Resistor, and Voltage Divider.
- Use this handy tool to figure out the right numbers: ESPHome Calibration Calculator.
- Start with the default values for your device (check the list at the end of this guide).
- Enter what your Device says the power readings are.
- Plug in a device with a known power use (like a 60-watt lightbulb) and type in the real value (if you have a Power metering device this will help make sure your calibration is Spot On).
- The calibration tool will give you new numbers—enter those into your device’s web page.
__________________________________________________________________________________________________
Default Calibration Values (Check Your Device Model):

__________________________________________________________________________________________________
Still have a problem:
If our support guides haven’t helped you with your issue and you still have a problem, or a question, feel free to reach out at support@smartpad.co.za and we will be sure to try our best to help.